Categories
Blog Code

Unrolling loops with templates

// Call the passed function object N times. This 'unrolls' the loop
// explicitly in assembly code, rather than creating a runtime loop.
template <unsigned int N, typename Fn>
void unroll(Fn&& fn) {
    if constexpr (N != 0) {
        unroll<N - 1>(fn);
        fn(N - 1);
    }
}

// extern function ensures the loop is not optimised away
extern void somethin(unsigned int i);

// Call somethin 4 times, passing the count each time
void four_somethins() {
    unroll<4>([](unsigned int i) {
        somethin(i);
    });
}

Categories
Blog

Rolling out Factors

Today’s post is an algorithm for ‘rolling’ out factors from any number. It determines all of the factors of that number, and hence whether it is prime.

This has grown from various doodles on paper, forming the idea that all natural numbers have a shape, a hyper-volume of N dimensions, where N is the total number of factors for that number.

Categories
Blog

Last Monday of 2019

I’ve been exploring two things today: a sort of 2D to 3D tunnel concept I’d like to render and; more experiments photographing bits of trees for my ‘overlaying stuff’ projects (working title…)

Categories
Blog Code

Nanopore Technical Challenge Day 2

Now to the meat of the problem, how the tasks actually run. Some of these tasks are going to run in parallel and that could cause threading issues. Looking at the original challenge there is an obvious sticking point. The two tasks ‘Preheat heater’ and ‘Mix reagent’ need to notify ‘Heat Sample’ they are done in a thread safe way so I will need a mutex. Alternatively I could use a thread safe boost::signal to inform the node that a task has finished, but that’s a bit heavyweight.

Categories
Blog Code

Nanopore Technical Challenge Day 1 … more doodling

These are some embarrassingly loose sketches made en route to a friend’s leaving do. I wanted to cement my ideas about the builder class and these led into the idea of how one defines a hardware device. I was getting painfully close to template magic with these ideas but wanted to get an idea for the most expressive DSL for a recipe.

Categories
Blog

Nanopore Technical Challenge Day 1 … part 2

I sketched out a few early ideas in code to get a feel on good approaches in software. As the DAG is being generated by a builder, I wanted to see if it was possible to use std::array for inputs rather than std::vector. Regardless, my first doodle was more just a simple DAG structure exploring the concepts of adding hardware dependencies: https://godbolt.org/g/5y3Gsa

This was very useful in identifying a minimal DAG node, called a Task in this example. A few points:

  • Technically I don’t need to store the inputs as I’ll be processing this DAG top to bottom.
  • The idea of serial and parallel operations being simple derivatives of task
  • All operations on the device would be task derivatives.
  • Avoid cycles during insertion (possible to static assert if DAG size is known at constrcution?)

The main() block makes a conceptual jump into a nice syntax for a builder class that builds up the DAG in a readable way, sort of like a DSL for lab protocols. The base TaskBuilder class is responsible for generating a single DAG node. The TaskBuilderContainer is responsible for a list of DAG nodes, and is derived from Task with an extra method end() to indicate the end of a scope block.

These builder classes are nicely wrapped up readable class methods like add_ingredient() or preheat(). recipe() should really be called workflow() and takes a name.


Categories
Blog Code

Nanopore Technical Challenge Day 1

A few days ago Nanopore sent me a technical challenge as part of their interview process. I’ve set up a a GitHub repo to track development progress. These are some notes before I go headlong into coding:

Day 1 – tech challenge received

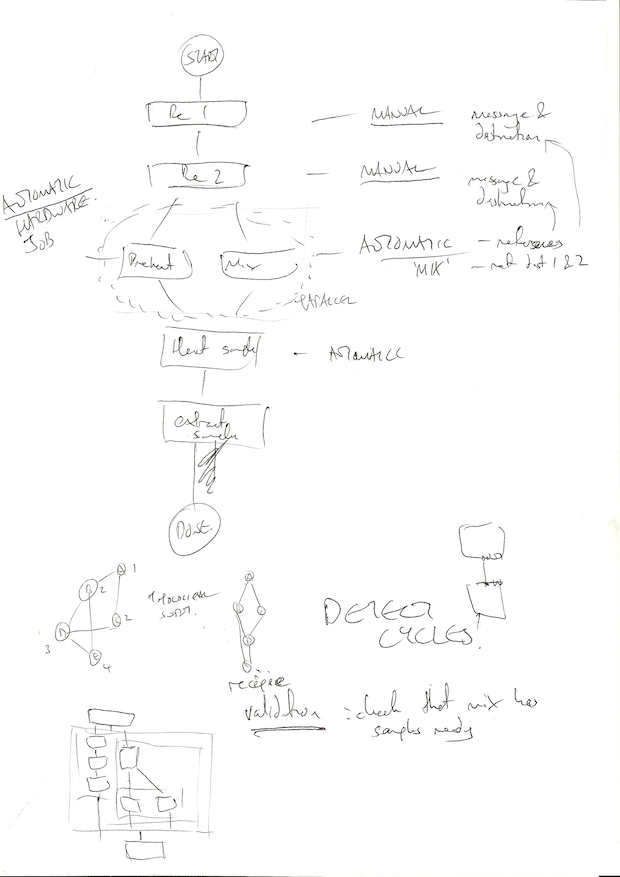
The challenge involves building a DAG for a workflow. The first thing I did on receiving it was sketch out their example DAG to get a better feel for the behaviour of each node:

Day 1 sketch

Forgive the quality of these scans, I’m cobbling this together fast! The first sketch highlighted the scope of the design for the DAG:

  • Whether a task is manual or automatic.
  • Functional behaviour (e.g. display message, move sample).
  • Specification of ‘ports’ on device
    • Input where user adds sample. I’ll call these input_a, input_b etc.
    • Output where user removes sample. I’ll call these output_a, output_b etc.
    • General input/output ‘cells’ which is where the device is moving samples around, which I’m assuming to be a 2×2 grid from seeing the VolTRAX videos. I’ll call these cell_1_1, cell_2_4 etc.
    • Certain cells do work, e.g. heating, applying magnetic field. I’ll treat these like regular cells but give them special IDs like heater_1.

Example tasks and data required:

  • Add ingredient (manual): show message; input port ID; destination cell to move sample to.
  • Mix ingredients (auto): two registers to mix; cell where the sample ends up.
  • Preheat (auto): heater temperature; heater ID if there is more than one.
  • Heat sample (auto): input cell location; time on heater; header ID if there is more than one; output cell location.
  • Extract sample (manual): show message; output port ID.

This highlights some missing data in the DAG, that the operations of moving between certain cells should perhaps be nodes in themselves. For example the ‘heat sample’ task would be simpler if it was split up using move tasks:

  • Move sample from cell_1_2 to heater_1.
  • Stay on (preheated) heater_1 for 2 seconds.
  • Move sample from heater_1 to cell_2_3.

A few other things came up in this sketch:

  • Being a DAG it needs to avoid cycles.
  • The ports/cells give me a conceptual device to work with.
  • Validation. If I know all the inputs and outputs then I can run a validation step to ensure that anything that uses a particular cell or input has had that cell or input set up; i.e. check hardware dependencies.
  • To run the program the nodes will need to be sorted topologically. Not necessary if nodes are inserted in-order.
  • My sketch at the bottom left is my thinking about organising parallel data tasks which let to builder concepts detailed in next post. I think I can get a nice DSL together.
Categories
Blog Code

Experimenting with Maze code in C++

Starting in Ruby

Recently I’ve been chipping away at Jamis Buck’s ‘Mazes for Programmers’. I’m loving it and highly recommend the book. The code examples are quick to write, intuitive and good to learn from. They are written in Ruby and quietly introduce good design practices.

Whilst I’m working through the book I’m uploading my work in progress to https://github.com/alexallmont/JamisMazes. It’s been a while since I’ve pushed anything to GitHub because I started working on some of the ‘try at home’ sections at the end of each chapter; as I was working through it I started restructuring the core libraries on a new branch. I’ve gone down the refactor rabbit hole.

Moving to C++

I’ve managed to distract myself further by making my own maze library in C++. At the time of writing the repo https://github.com/alexallmont/MazeCpp is a simple C++ library which links into a demo and unit tests. My goal here was to brush up on my C++14 and experiment with continuous build systems. Over the last few days though I’ve been irked by the clunky design on the first draft. There’s lots of aliasing early on, the code was already feeling flabby.

Playing with templates

Today I’ve been experimenting with a templatised version that compiles down to practically nothing. I wanted to exploit that these mazes are fixed size, so I can use std::array to store data rather than std::vector. This means a huge amount of work can be done at compile time. Today’s experiments are at https://godbolt.org/g/ko0WIz.

The main class Grid2D is declared as a template with fixed rows and columns. Having the rows and column sizes declared at compile time means that a lot of the API boils down to constexpr functions. Rather than have a separate ‘Cell2D’ class, each Grid2D declares a nested Cell class that is a lightweight wrapper for querying individual cells in the maze graph.
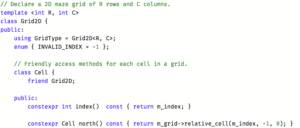
Screen Shot 2017-06-11 at 17.26.09

I was hoping that I could reduce each cell to be a single integer, it’s index in the grid (row * NUM_ROWS + column). Unfortunately reducing to an int was not possible because each cell has query methods that reference non-static methods in Grid2D, so they also need to store an instance pointer to their owning grid. The alternative to this aliasing would be to pass the grid to every Cell function call, but that breaks the encapsulation and does not read well in code. However when building optimised the pointers boil away.

I’d prefer to store each cells Grid2D by reference rather than pointer and I’m exploring options as to whether that’s possible with std::array. As far as I know one can only use std::array on simple data types, no fancy construction is allowed, so the Cell class is friendly with Grid2D which does all the initialisation.

Regardless the simple test case compiles down ridiculously small, just 4 ops!

Screen Shot 2017-06-11 at 17.23.56

Screen Shot 2017-06-11 at 17.26.50

Categories
Blog Music

Chains display and inputs

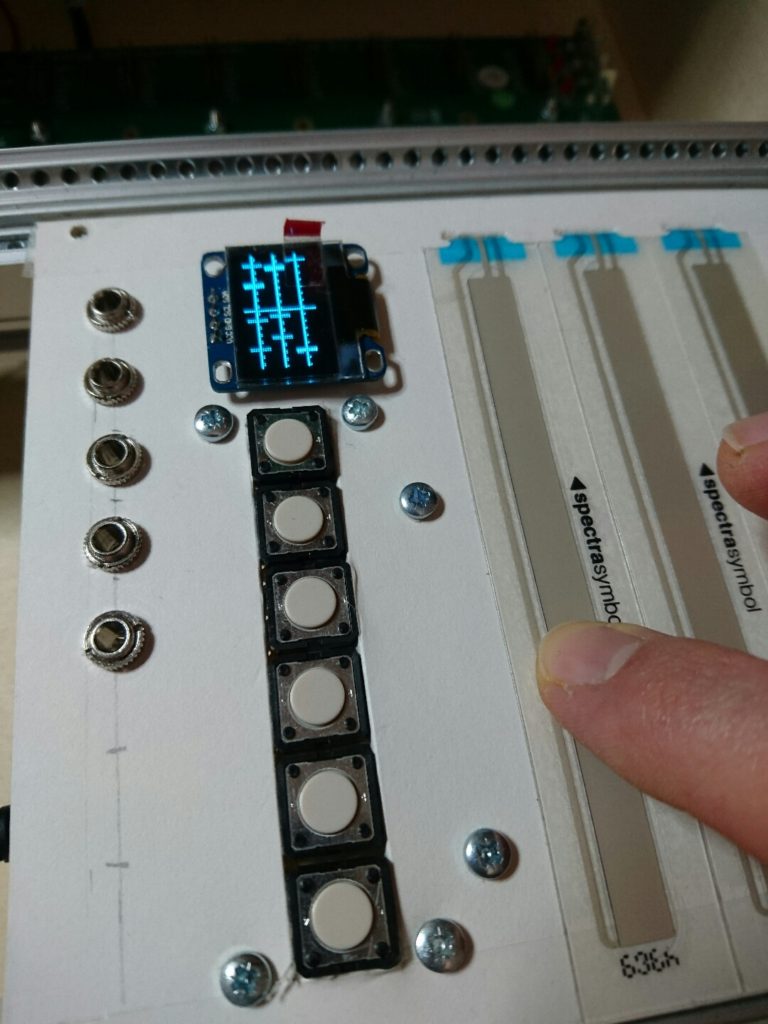
I wired up the the Chains prototype to display a series of events which can be controlled from the SoftPots. It’s cobbled together with scruffy code but it’s encouraging to see something responding real-time.

dsc_0344

There are some glitches in the inputs where it can jump in certain cases – it’s like there’s noise on the pots. This could be due to it being mounted on cardboard as the flex picks up subtle pressure changes. It’s pretty sensitive, just massaging the pot with a fingertip has a noticeable effect.

The display was up and running pretty quickly with Adafruit GFX and SSD1306 libraries. I bought some displays a while back, I think this one is a cheap version on Amazon and there were some helpful tips in some of the comments. I thought I would need to change the I2C address but I there was no need – just install the libraries in the Arduino IDE and experiment with the Adafruit demos, nice!

Plan for tomorrow:

  • Hook up the buttons and the input ports
    • buttons just needs pull up resistors
    • clock/reset inputs need transistors
    • analogue inputs need protection op amps
  • Mock up a first pass interface to record input from CV and softpots
    • I’m not sure how best to data collect so I’ll run a through iterations on a local repo and see how it goes.
  • Experiment averaging the inputs on the pots to avoid glitches.
  • If there’s any time I’ll wire up the outputs though they’ll be limited to 8 bit PWM for now.
Categories
Blog Music

Prototype rig for new module

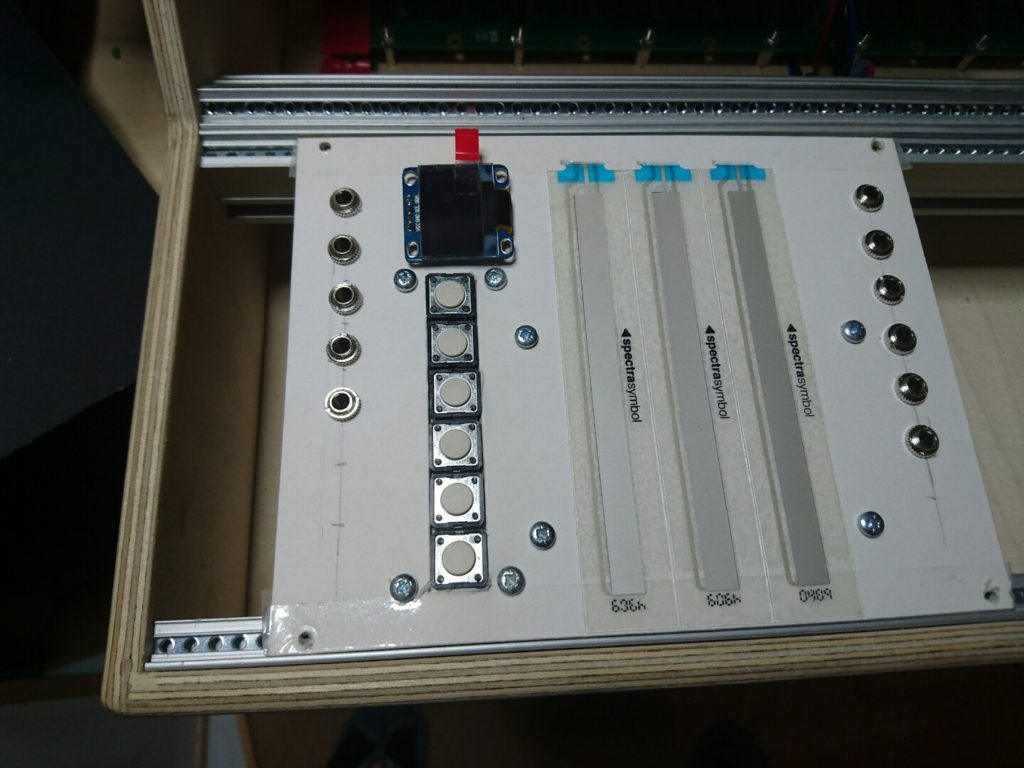
Today I mocked up a rig for a rhythm module I’ve been dreaming up for ages called ‘Chains’. The three vertical bars are SoftPot linear touch-sensitive potentiometers and the screen will give visual feedback on what’s going on internally.

dsc_0341

The five inputs on the left will handle clock, reset and two individual analogue inputs which can be recorded to each chain – I’ll need some kind of toggle switch here to select.  The fifth input is an idea I’m keen to play around with: quantisation and anti-quantisation. The idea is 0V will leave a recording as-is, +5v will pull an event to the nearest 16th or 32th note, but -5v will push it away by the same amount. I have no idea if this will work but it’s there to try as the whole idea is ways of making rhythm more organic.

There are space for a few more inputs as needed but I’m going to start simple. Most of the interaction is done through the buttons under the screen. I’m using big, clear buttons for actions rather than fiddling around with a rotary encoder as this needs to be fast and intuitive for live interaction. The buttons will handle things like record, clear, motif load/save. I also need something for motif length adjustment – maybe individual tempo too – and I’m sure there will be more idea so the sixth button is for experimentation or may end up being a dreaded ‘shift’ button so I can double up operations on the five other buttons.

Finally the outputs on the right simply dump out whatever is on a particular chain at that point in time, be it CV or gate info. I’m glad I built this on cardboard because it gave me a better sense of positioning the controls away from the pots, it’s fun developing UX physically (well, it’s not really UX if you’re a purist, but it’s a step up for me dreaming things up and expecting them to work first time!).

dsc_0342

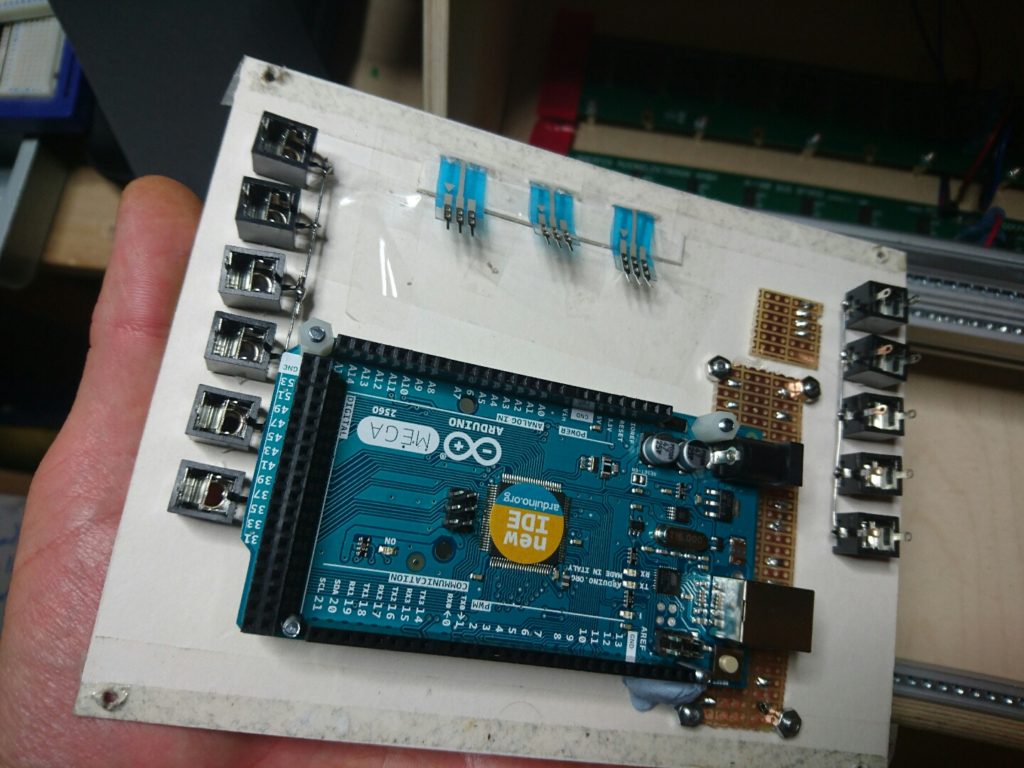
From the back the board is a scramble. I’m using the bigger Arduino as a mock up purely because I don’t know how many inputs or outputs I’ll need for now, it’s overkill. The final version I’d like to bake into an AVR but I’m thinking that being able to upload firmware will be a massive boon for rapid development if I ever made this thing commercially.